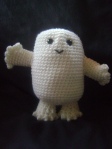
New Tutorial for the Amigurumi Adipose

The Tutorial is for the Fingers and Toes Only for the pattern.
Right now I have the one for the finger/hand competed and up, soon the toes will be added.
Lots of photos!
The Pattern for the Amigurumi Adipose can be found HERE
The Tutorial for the Fingers can be found HERE
Check back soon for the Tutorial for the Toes.
Toes Tutorial can now be found HERE, under the Fingers Tutorial!
Busy Weekend!
First of all, New Theme! I updated my WP look. I liked my old theme a lot, but I’ve had it for quite awhile now and I really needed a fresh new look. I really like the look of this theme, a lot. One day I may change the background image if I find something else I like, but for now, there is just something I like with the default background that came with this theme.
Second, Tutorials! I have 4 tutorials up that I did this weekend, all having to do with the Crocodile Stitch, all in one place! You’ll find the Basic Stitch, Making Increases to make that “triangle” shawl-look or a head kerchief, “In the Round”, and with a Solid Foundation. All with lots of photos. They all can be found on my new Tutorial page! Next I will be making “pattern specific” tutorials, mainly for my Amigurumi Adipose. Over the years, there have been many, many questions about the hands and feet, and even though I have rewritten and updated the pattern recently, I think a couple of photo tutorials might help also. I am also asking if there is anything anyone would like to see me make a tutorial for. If there is anything, comment or email me and I’ll see if it’s something I’m able to do. One thing I cannot do is make video tutorials. I do not have the set up, equipment, nor the video editing programs, to make them. Also, if there are any good tutorials elsewhere that I can link to on my Tutorial page, leave me a link in the comments here, or on the page, and I’ll add it to the list.
I have written the pattern for my husbands Dragon Skin Pouch, but it still needs photos taken. I still need to get him over to JoAnns to pick out fabric for the lining and a button he likes, too. Once that it done, the pattern will be posted for purchase. I did start making another pouch for myself in Lion Brand’s Vanna’s Glamour Sapphire. It’s my new “purse project” for when I’m on the go and have those unexpected wait times.
In middle of all of this, I am working on my Grandmother’s shrug, working with my testers to get the Dragon Scale Shrug up for purchase, and looking for new testers for my Daughter of Dragons Shrug. Right now, I have some of the info in THIS POST, but I plan on making a new post specifically with all of the info needed very soon, if not right after I finish writing this post. So keep a look out for that if you are interest, or you could message me on Facebook, or email me with any questions about the testing.
Amigurumi Adipose Pattern Update
The updated pattern is now up for free download. I (hopefully) fixed the stitch count/math problems and I have completely rewritten Rnd 9 of the arm/hand. I hope it’s more understandable now than it was. It seemed that the hand was the most problematic for many people as that was the subject of a lot of emails and messages I had received over the past 6yrs. I have also added a couple of photos of the hand and foot for reference. The pattern still has not been tested, so any errors still in it are mine, so please contact me if any are found. Thanks.
I also changed the name to Amigurumi Adipose from Amigurumi “Fat” Baby. I made the name change decision because of my pattern being featured on BBCAmerica.com 2yrs ago.
I am keeping open the Amigurumi “Fat” Baby FAQ & Errata page for all patterns downloaded before the update today.
About my Adipose Pattern
It’s not like I don’t have tons of projects that I have to finish already, but it seems that after 6yrs, I really do need to rewrite my Amigurumi “Fat” Baby pattern, which means I need to sit down and actually crochet it again. The original pattern had never been tested and I know more now about pattern writing than I did then.
I also found that I even had an error in my math in my errata post, which has now been corrected.
Amigurumi “Fat” Baby FAQ and Errata
I’ve had many people over the years message and email me with questions about my pattern, so I decided to make a FAQ/Errata Master Post.
* This is the FAQ and Errata for the original Amigurumi “Fat” Baby pattern downloaded before September 12, 2012*
The updated pattern can be downloaded HERE
There is now a Photo Tutorial for the Fingers and Toes/Foot Only
1. “When you said to ‘ch 10 and join’ then ‘ch 1, 15 sc around starting chain’, what did you mean?”
I meant is that you need to do is increase evenly, meaning you will make 2 single crochets every other stitch: single crochet in same chain as joining, 2 single crochet in next chain, *single crochet, 2 single crochet*, repeat the part between the * until there are 15 stitches, then continue on without joining, working in a spiral making sure to use a stitch marker to mark the last stitch of the row and move it up accordingly.
2. “I was wondering if it’s not too much trouble could you rephrase Rnd 7 and 8 [of the arm]?
For Rnds 7 & 8:
[Rnd 7 – sc in next 3 sc, sc in next sc, [sc, dc, sc] in next sc, sc in next 7, 2 sc in next sc,
sc each sc around, move up marker (19 sc, 1 dc)]
In this round you are making the increase to make the thumb in the next round:
single crochet in the next 3 single crochet from the previous round after the stitch marker (you should be working in a spiral, do not join the rounds). single crochet in the next single crochet, then single crochet, double crochet, single crochet in the next single crochet (all 3 stitches should be made in the same stitch of the previous round, making a 2 stitch increase). single crochet in the next 7 single crochet. 2 single crochet in the next single crochet (increase made). single crochet to end of the round and move up the stitch marker.
[Rnd 8 – sc in next 4 sc, draw up loop in next sc, skip dc, slip stitch in next sc (thumb made) sc in each sc around]
In this round you are decreasing a stitch, which will be the double crochet, but I think I might have a typo here though, I think it should read:
single crochet in the next 3 (not 4) single crochet. now in the 1st single crochet of the [sc, dc, sc] increase, insert the hook into stitch and pull a loop through, then skipping the double crochet, insert the hook into the next single crochet and make a slip stitch and pull tight behind the double crochet. the double crochet should “pop out” on the front of the work thus making the thumb. then just single crochet around as normal.
3. “I’m kind of confused after round 1. it says do not join and to work in spirals. I don’t know what that means.
Well, basically you just keep on crocheting. When you reach the very 1st stitch of the round, place a stitch marker in the last stitch of the round, then crochet in the 1st stitch of the round and each stitch there after until you reach the stitch marker, then remove the maker, crochet in that stitch, then replace the stitch marker and repeat the entire processes.
4. I’ve had a few questions about the stitch count on the body after Rnd 5.
If this helps, all ending stitch counts on the rnds should be a multiple of 7 (7×1, 7×2, 7×3, 7×4, etc)
(Row counts are off by one stitch starting at Rnd 5. Rnds 5-26 should have 1 more stitch than indicated. Rnds 28-31 continue with the correct counts.)
5. The stitch counts for Rnds 6&7 [of the arm] are wrong.
Rnd 6 is supposed to have 17sc and Rnd 7 is supposed to have 19sc & 1dc.
6. Problem: The foot.
The pattern reads-
Rnd 3 – Working in back loop, sc in next 8 sts, working in both loops, sc, trc, sc in the next 5 dc (toes made), working in back look, sc in next 4 sts, move up marker (22 sc, 5 trc)
The first 6 sts only should be sc, not the first 8. Same with the rest of the foot.
Rnd 3 is supposed to have 20 sc, not 22, and rnds 4&5 are supposed to have 10 sc, not 12.
What foot looks like from the top:
7. Problem: working the fingers and closing the hand in Rnd 9.
*New rewritten Rnd 9 as of 09/11/14:
Rnd 9 – sc in next 4 sc (flatten work), skip thumb, dc in sc after thumb (The side of work that is facing you and the thumb is now pointing at the hand holding the hook is now considered the front side. The side facing away from you is now the back side), dc in sc in the back side that is parallel to the front dc just made, slip stitch in next sc in the front side and back side together (first finger made), [dc in next sc in front side, dc in next sc in back side, slip stitch in next sc in front side and back side together] 3x’s (3 fingers made) There will be 1 sc that will be left unworked. (8 dc and 4 sl sts = 4 fingers)
*front side is the side facing you, back side is the side facing away from you*
You do need to pull the slip stitches snug though to keep the stuffing from poking out.
I originally had #7 up with #2, but I recently had gotten 2 emails in as many weeks that had problems with understanding how to close the hand, so I decided to put it on it’s own.
8. How to Crochet a Magic Ring:
Also known as a crocheted Magic Loop. So far I’ve only had one person ask me this, but I felt it worth to put it here anyway. I recently found a good tutorial on how to do this. It has nice photos with the written instruction, and it also includes a link to youtube for a video tutorial.
How to Crochet a Magic Ring by Kara on petalstopicots.com
It is possible that more FAQs or Errata may be added in the future.
If you have any other questions, please email me at midknightstarr@gmail.com
Thank you
The pattern can be downloaded HERE
Photo Tutorial for the Fingers and Toes/Foot can be found HERE


